Using Raspberry Pi as VPN router
Motivation
We need TV to work not in the local country but be visible as if it's working from another country to overcome certain restrictions.
What we need
- Raspberry Pi or Orange Pi or basically any micro-computer with Linux installed.
- I used Raspberry Pi ver 4 with Gbytes of RAM and Raspbian 64 bits without GUI.
- Ethernet USB Dongle.
- Raspberry has only one Ethernet port, so we need to use external Ethernet adaptor. Pi has 4 USB ports so we are safe here.
- Router with Ethernet ports.
- You need to understand what is the IP address you router provides to the connected devices for easier identification of the Ethernet network adaptors in the next steps.
- Login to your router, find DHCP setting and find something like Start IP address in the DHCP settings.
- in my case that was 192.168.0.10, this means Raspberry Pi will get something like 192.168.0.XXX, where XXX is something more or equal to 10.
- 2 Ethernet cables
- 1 for TV <> Raspberry Pi
- 2 for Raspberry Pi <> Router
- yes, yes we can use Wi-Fi for that, but we won't. Still it'll work the same way.
- VPN provider (you can be one, or you can buy some that supports TUN).
- I'll use OpenVPN client with ProtonVPN VPN profiles.
Target solution diagram
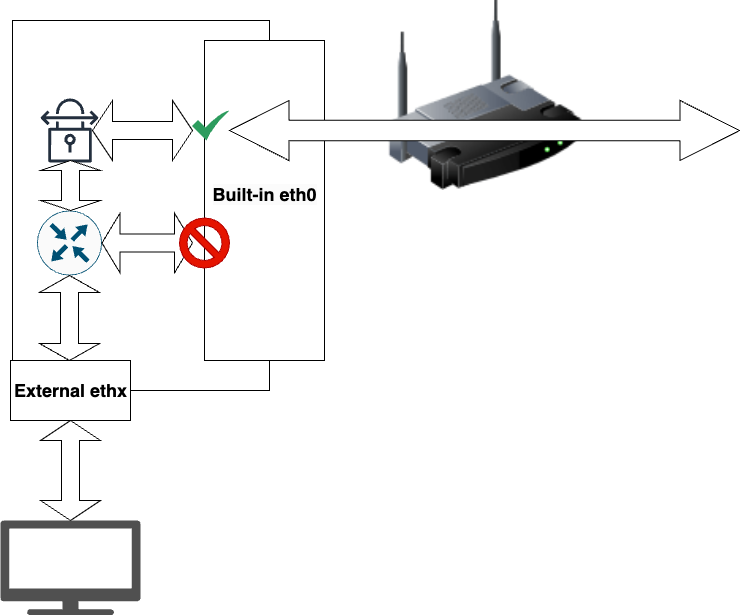
Raspberry Pi is going to wrap our TV's traffic into VPN connection and forbid the direct internet traffic from/to TV.
Let's get crackin'
Get all the stuff together
- Install the OS to Raspberry Pi (use their tool for installing the OS).
- Connect all the wires as per the image above.
- Login to Raspberry Pi and start the configuration.
Gather the names of the Ethernet network cards
The names provided in the picture above can be different from those you have in reality.
There is standard command in Linux OS ifconfig that provides the information on the network devices installed in your device. Or mode modern they say ip
Let's use ifconfig.
ifconfig | grep -B 1 -A 1 '192.168.0'Where | grep -B 1 -A 1 '192.168.0' allows us filtering the output based on 192.168.0 and outputs 1 line before the match and 1 line after the match.
the output will be something like
wlan0: flags=4163<UP,BROADCAST,RUNNING,MULTICAST>  mtu 1500
        inet 192.168.0.21  netmask 255.255.255.0  broadcast 192.168.0.255
        inet6 fe80::20e:c6ff:feac:eaf9  prefixlen 64  scopeid 0x20<link>
This means Raspberry Pi got the IP address 192.168.0.21 from my router, and the device that is used to connect Raspberry Pi to the router is wlan0.
Now, if we execute same command again but without the grep part, we'll understand the whole piceture better.
ifconfig
eth0: flags=4163<UP,BROADCAST,RUNNING,MULTICAST>  mtu 1500
        inet 192.168.99.1  netmask 255.255.255.0  broadcast 192.168.99.255
        inet6 fe80::dea6:32ff:fe90:dff3  prefixlen 64  scopeid 0x20<link>
        ether dc:a6:32:90:df:f3  txqueuelen 1000  (Ethernet)
        RX packets 36583  bytes 3012811 (2.8 MiB)
        RX errors 0  dropped 0  overruns 0  frame 0
        TX packets 541  bytes 30596 (29.8 KiB)
        TX errors 0  dropped 0 overruns 0  carrier 0  collisions 0

wlan0: flags=4163<UP,BROADCAST,RUNNING,MULTICAST>  mtu 1500
        inet 192.168.0.21  netmask 255.255.255.0  broadcast 192.168.0.255
        inet6 fe80::20e:c6ff:feac:eaf9  prefixlen 64  scopeid 0x20<link>
        ether 00:0e:c6:ac:ea:f9  txqueuelen 1000  (Ethernet)
        RX packets 658907  bytes 521544026 (497.3 MiB)
        RX errors 0  dropped 0  overruns 0  frame 0
        TX packets 369340  bytes 624843599 (595.8 MiB)
        TX errors 0  dropped 0 overruns 0  carrier 0  collisions 0

lo: flags=73<UP,LOOPBACK,RUNNING>  mtu 65536
        inet 127.0.0.1  netmask 255.0.0.0
        inet6 ::1  prefixlen 128  scopeid 0x10<host>
        loop  txqueuelen 1000  (Local Loopback)
        RX packets 41295  bytes 6760015 (6.4 MiB)
        RX errors 0  dropped 0  overruns 0  frame 0
        TX packets 41295  bytes 6760015 (6.4 MiB)
        TX errors 0  dropped 0 overruns 0  carrier 0  collisions 0
For lo interface we have no interest, this is standard loopback. And there is eth0 interface which is up as well and has an IP address, this one seems to be the TV box we connected. There will be another interface which is missing now, something like tunXXX, it will be created by the VPN application.
For sake of this very example, we'll use
wlan0 as the network adaptor that is connected to our router
eth0 as the network adaptor that is connected to our TV
Setup the interface towards the telly
The telly will receive the IP address from the Raspberry Pi, so we need to setup the interface facing towards the telly as the DHCP server.
To do so, we need two things running on the Pi:
- DHCP daemon
- that would be dhcpcd is the DHCP daemon, running on a linux machine, I hope you can search the internet
- DNS/DHCP server
- that would be dnsmasq
Installing DNSMASQ
sudo apt install dnsmasq -yConfiguring DNSMASQ
The eth0 device will provide the IP address for the telly. My choice is to create a network 192.168.99.1 with network mask 255.255.255.0 (whih is in CIDR notation will be /24).
So, we configure /etc/dnsmasq.conf file as follows.
sudo mv /etc/dnsmasq.conf /etc/dnsmasq.conf.orig
sudo nano /etc/dnsmasq.conf
The content of the file will be the following.
interface=eth0       # Use interface eth0 for DHCP
dhcp-range=192.168.99.10,192.168.99.20,255.255.255.0,24h  # DHCP IP range and lease time
dhcp-option=option:router,192.168.99.1   # Default gateway IP address
dhcp-option=option:dns-server,8.8.8.8,8.8.4.4  # DNS servers
Save, exit. Restart the dnsmasq.
sudo service dnsmasq restartor if you prefer
sudo systemctl restart dnsmasqConfiguring dhcpcd for eth0
This has to be explicitly shown to the dhcpcd that the eth0 interface has a static IP address.
Edit the configuration file for dhcpcd.
sudo nano /etc/dhcpcd.confadd the following to the file.
interface eth0
static ip_address=192.168.2.1/24
Then save and restart the daemon's service.
sudo service dhcpcd restartEnable IP forwarding for IPv4
sudo nano /etc/sysctl.confUncomment or add the following line.
net.ipv4.ip_forward=1Save and check.
sudo sysctl -pGet VPN up and running
I'm considering there is a VPN service in place and you've got configs for OpenVPN. We'll use nl.protonvpn.net.udp.ovpn for sake of this example.
Install OpenVPN
sudo apt update && sudo apt upgrade -y
sudo apt install openvpn -y
Create a folder anywhere it won't be occasionally deleted. Jump to the folder and create files in this folder (and consider making backup copy from time to time ).
mkdir ~/sec
cd ~/sec
Copy nl.protonvpn.net.udp.ovpn to the said folder.
Starting VPN connection
sudo openvpn --config ./nl.protonvpn.net.udp.ovpn --daemonAs soon as OpenVPN will start and open VPN connection, tun0 interface will appear in the output of ifconfig command.
tun0: flags=4305<UP,POINTOPOINT,RUNNING,NOARP,MULTICAST>  mtu 1500
        inet 10.96.0.15  netmask 255.255.0.0  destination 10.96.0.15
        inet6 fe80::f911:3c80:8471:dc80  prefixlen 64  scopeid 0x20<link>
        ...
This is the interface we want our TV box to use for the internet access.
Also we can check if OpenVPN is running
ps aux | grep openvpnRoute all traffic of TV via VPN
Now, we need to forbid the TV box from using any connections except tun0 to connect to the internet.
We'll use iptables to define the allowed routes. And we'll also need to keep our changes persistent, so we need to install
sudo apt update && sudo apt upgrade -y
sudo apt install iptables
sudo apt install iptables-persistent
iptables generally allows managing and viewing rules for ip traffic, iptables-persistent allows making the changes you've made persistent across reboots.
Check what are current rules
sudo iptables -L -v -n --line-numbersWe don't need any residing rules, so let's flush it all
sudo iptables -F && sudo iptables -t nat -F && sudo iptables -t mangle -F
sudo iptables -X && sudo iptables -t nat -X && sudo iptables -t mangle -X
to avoid blocking the traffic we can create default policy
sudo iptables -P INPUT ACCEPT && sudo iptables -P FORWARD ACCEPT && sudo iptables -P OUTPUT ACCEPTRouting TV traffic via VPN tun0
Now, we're starting to manipulate the IP tables.
Append a rule which forwards all packets from eth0 to tun0.
sudo iptables -A FORWARD -i eth0 -o tun0 -j ACCEPTAllow traffic for established and related connections from eth0 to tun0.
sudo iptables -A FORWARD -i tun0 -o eth0 -m state --state RELATED,ESTABLISHED -j ACCEPTEnable NAT (Network Address Translation) for outgoing packets on tun0, so they appear to come from the VPN’s IP address. This is essential for devices on the local network (our TV) to route traffic through the VPN and receive responses correctly.
sudo iptables -t nat -A POSTROUTING -o tun0 -j MASQUERADEIf we want these rules to work after a reboot, then we need to make these persistent.
sudo iptables-saveThen we can check the current state of iptables.
sudo iptables -L -v -n --line-numbersThe output will be summat like this.
Chain INPUT (policy ACCEPT 11644 packets, 11M bytes)
num   pkts bytes target     prot opt in     out     source               destination

Chain FORWARD (policy ACCEPT 1797 packets, 125K bytes)
num   pkts bytes target     prot opt in     out     source               destination
1     2732  421K ACCEPT     0    --  eth0   tun0    0.0.0.0/0            0.0.0.0/0
2     7424 9290K ACCEPT     0    --  tun0   eth0    0.0.0.0/0            0.0.0.0/0            state RELATED,ESTABLISHED

Chain OUTPUT (policy ACCEPT 7720 packets, 1291K bytes)
num   pkts bytes target     prot opt in     out     source               destination
Turn on your TV and check.